Is there any better way to spend an afternoon than to do a hundred complex steps, trying not to destroy a precious original camera negative, handling a very light-sensitive fresh stock and squeezing it all in a circa 1950s darkroom equipment?
Yes, imagine doing it all in complete darkness for 45 exhausting minutes!
The main idea is simple: Take a frame on a film negative you like, copy it to another film negative and you get a perfectly sharp positive slide you can frame and project. Ideally, there is no quality loss whatsoever and the results are much better than with any other method.
Problems everywhere
As you can imagine, it is not that easy…
Problem 1: Almost all negative films have orange masks, that means when simply copying negative to negative, the positive frame will look awfully orange.
Solution 1: We need to find a negative film without such orange mask. The already maskless slide films won’t help (copying negative onto slide will lead to another negative frame as no color inversion happens). Unfortunately, only two maskless films are currently available, when I started this experiment I knew of only one, the Rollei CN200.

Problem 2: How to copy from the source to the target film is the next issue. One can scan the source film, then do a “film-out” from the digital image on a computer screen onto the film by re-photographing. This works pretty well actually, I will present this in another post, but we will always get at least some lens distortions and all sorts of other quality losses. Or doing it entirely optically, one can copy with a close-up lens, but yet again this will not yield perfect quality.
Solution 2: Contact-printing without any optical pieces in between will yield the best quality. It simply requires two negatives, emulsions pressed evenly onto each other, and some light shone through the source onto the target film
Problem 3: Exposing the films for the correct amount of time with a light source of suitable color is another important point. With slow photography paper or very old film one might get away with turning on a light shortly by hand. But the film used is a ISO 200 type and way too light-sensitive for this approach. Also I wanted to have reproducible results, therefore needed a light source, preferably with differently colored lights, that could be turned on for various durations very accurately.
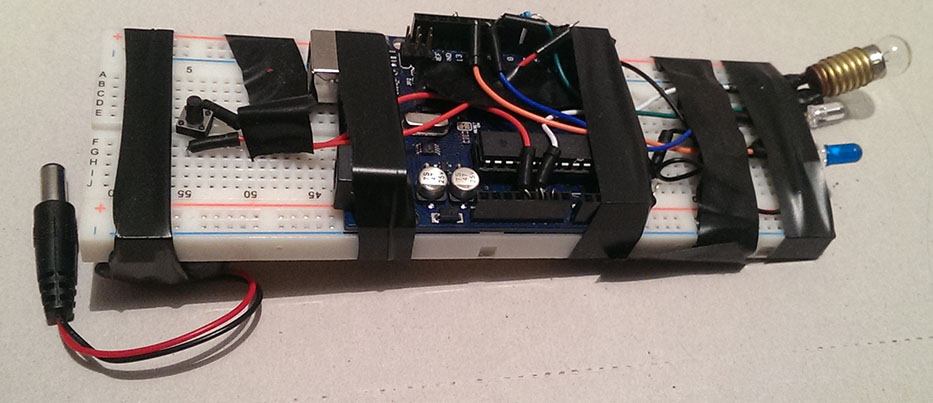
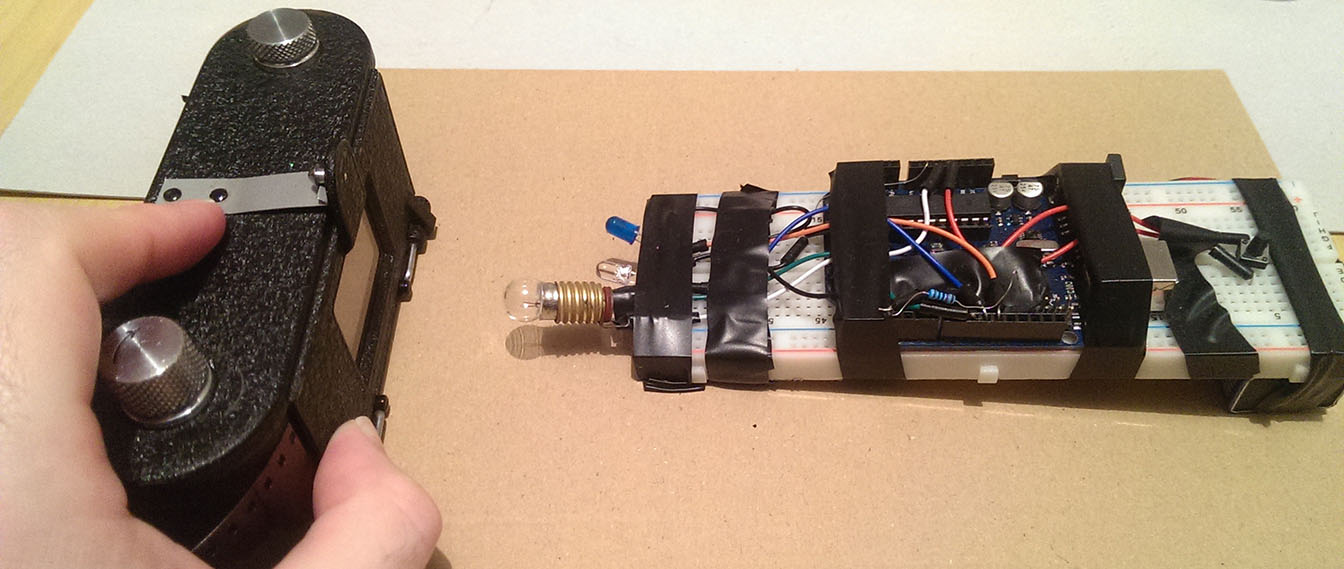
Solution 3: Using an Arduino micro controller that I programmed and connecting different light sources and a battery on a bread board created a very effective prototype that was built within 30 minutes. The switch on the left triggers an exposure, this turns on the currently used light source for a specified duration: 1/60s on the first click, 1/30 on the second, followed by 1/15, 1/8, 1 sec and 2 seconds. After pressing the button those six times, the next light is selected and again all six durations are used and finally the last, third light is used six times as well. This setup is meant to be used on one single sample frame (shooting 6×3=18 frames from the same source frame) and to directly compare different durations and light colors this way. Then a second sample frame can be printed onto the other 18 frames of the 36 frames target film. The light sources attached are a tungsten lamp, a white and a blue LED. The durations were chosen to cover a range of different exposures to find out which one will fit the best. They were actually based on earlier experimentation, using a camera without a lens but a negative in front of it and measuring the exposure through the base of the negative. The light coming from the different LEDs were measured with the camera’s internal light meter.
A 1950’s piece
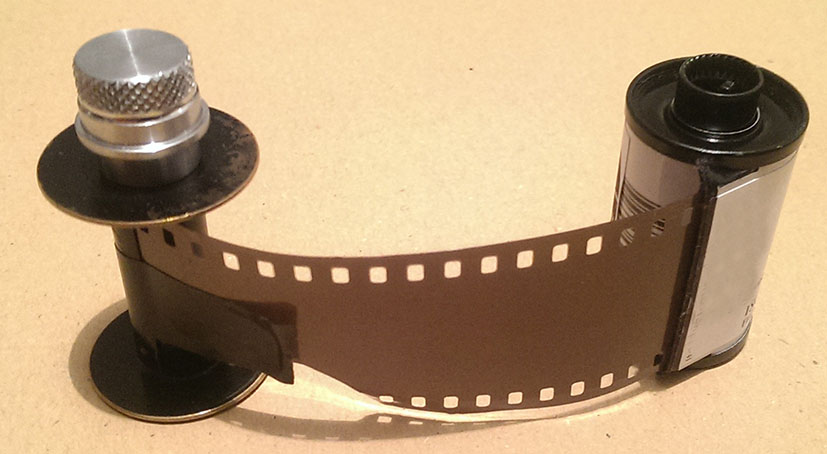
To contact print, I bought a circa 1950s Leitz Eldia that was used back in the day to copy black and white films. Below you can see its parts. You tape the target film to the feed spool (1) and roll all fresh stock onto it. Next you tape the end of the fresh stock onto the take-up spool (2). Both spools are inserted in the pockets (3a, 3b). The film has to go through the very tight printer gate (4), the top cover (5) holds everything in place.
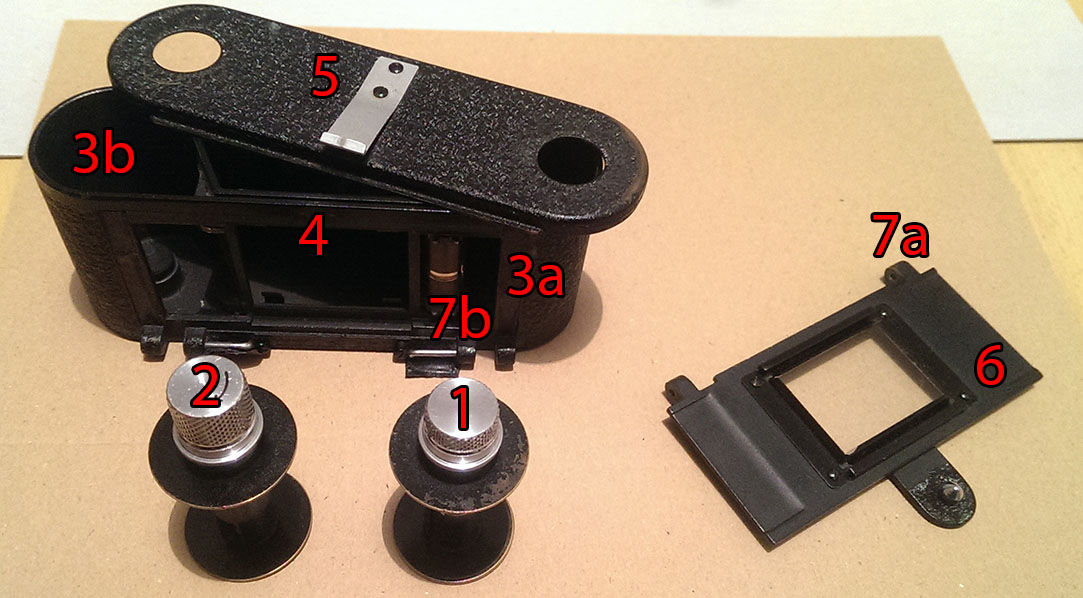
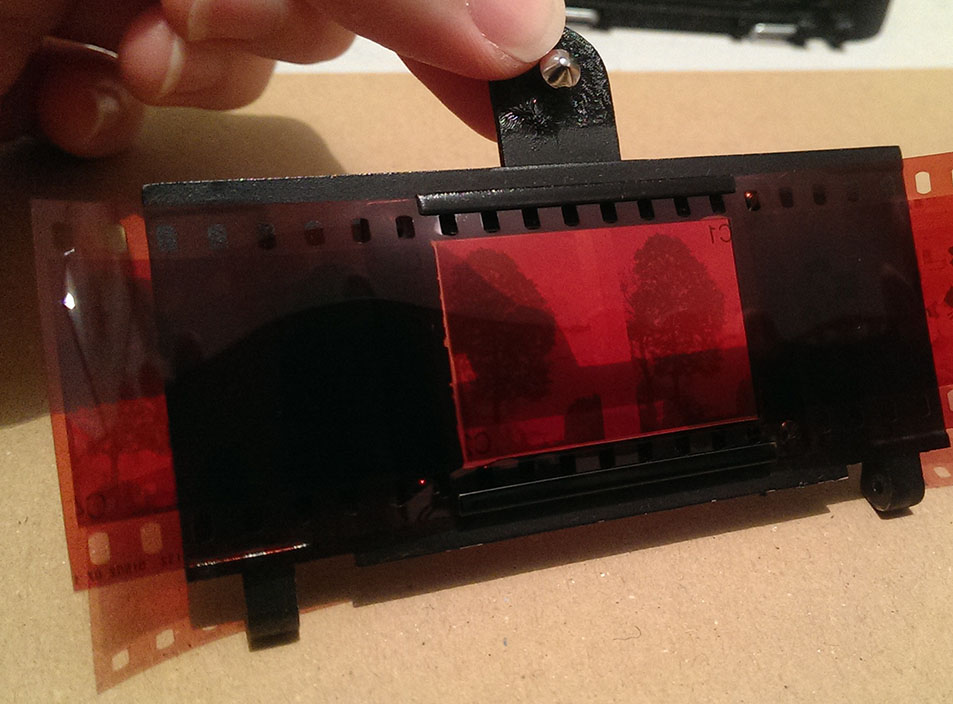
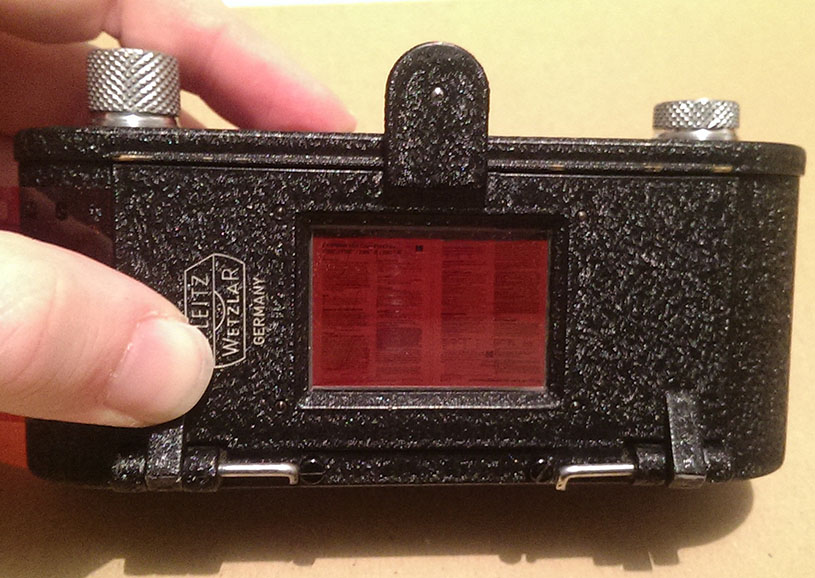
Finally, the source film negative is fed through the rails around the glass window piece (6). Normally, the glass window piece would always be connected to the main body, the two teeth (7a and a second one on the other side of the glass window) would go into the two spaces (7b and on the other side of the main body) and the two silver rods next to the spaces would be pushed inwards to keep them in place. Usually you can only tilt the window a bit, pictured above is how I moved the rods outwards to remove the glass window piece, I will explain in the next section why this is necessary.
No safe-light for you
A big problem arises, as the Eldia was created to be handled in safe-light with black and white film that is not sensitive to red. You could actually use red light and see exactly what you were doing. You could easily try how to place your source negative in the glass window piece and make sure the target film is set up correctly.
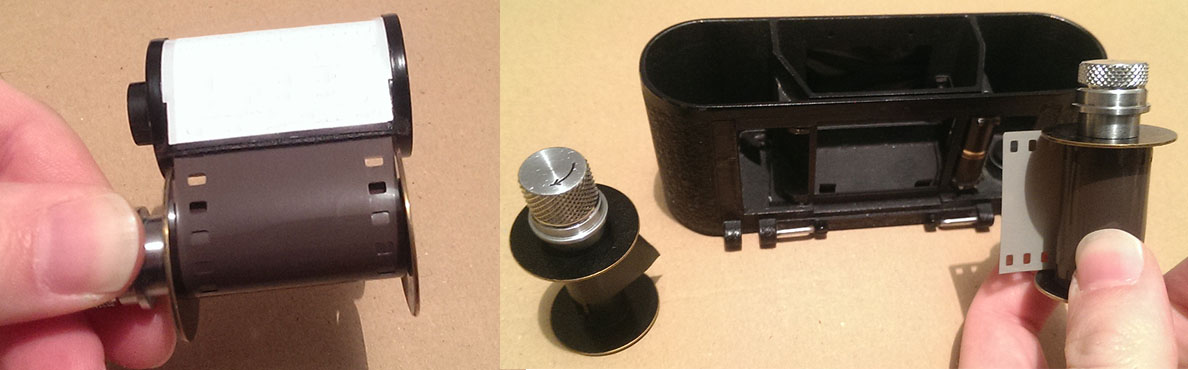
However, since I am using color film that is sensitive to all colors, all the steps involving the fresh and light-sensitive target film need to be handled in complete darkness. As shown below, you can see that the spooled film has no protection against light whatsoever, the spools are completely open and the Eldia printer itself is not light-proof either.
Come up with a plan
I found no description on the internet of anyone else trying to mess with color film in the Eldia so I just had to come up with my own personal process steps on the fly, how to handle source and target film without damaging, scratching, fogging, how to expose for just the correct amount of time with the best light source and then successfully spool everything back into the developing tank, all in complete darkness, without seeing a thing.
Preparing for processes in darkness basically means that you try different things, check which way you can get the film to end up in the right spot whilst still looking, in light, with a test film. Next you try it again with your eyes closed. If what you tried is somewhat doable without too much cursing, you found one step to check again in complete darkness, once more with the test film. If it all gets stuck somewhere you look for another way to do it. Then, in the end, you piece together all the steps and do them over and over again until you feel confident to try them on the real film.
Since there is no good way to make sure your source negative is framed correctly without seeing it, I decided that this step needs to be done in light. As shown above, I noticed that you luckily can detach the glass window piece, so you could load and verify the correct loading of a source frame in light. The light-sensitive target film needs to stay in complete darkness and once satisfied with the framing of the source negative, you can go back into the darkroom. This means that if you print n different frames, you need to go into light and back into the darkroom n times, always making sure that the unprotected fresh film is put in some light-proof container before opening any doors.
The complete process
In light:
We start off by applying tape to both the feed and take-up spool of the Eldia.

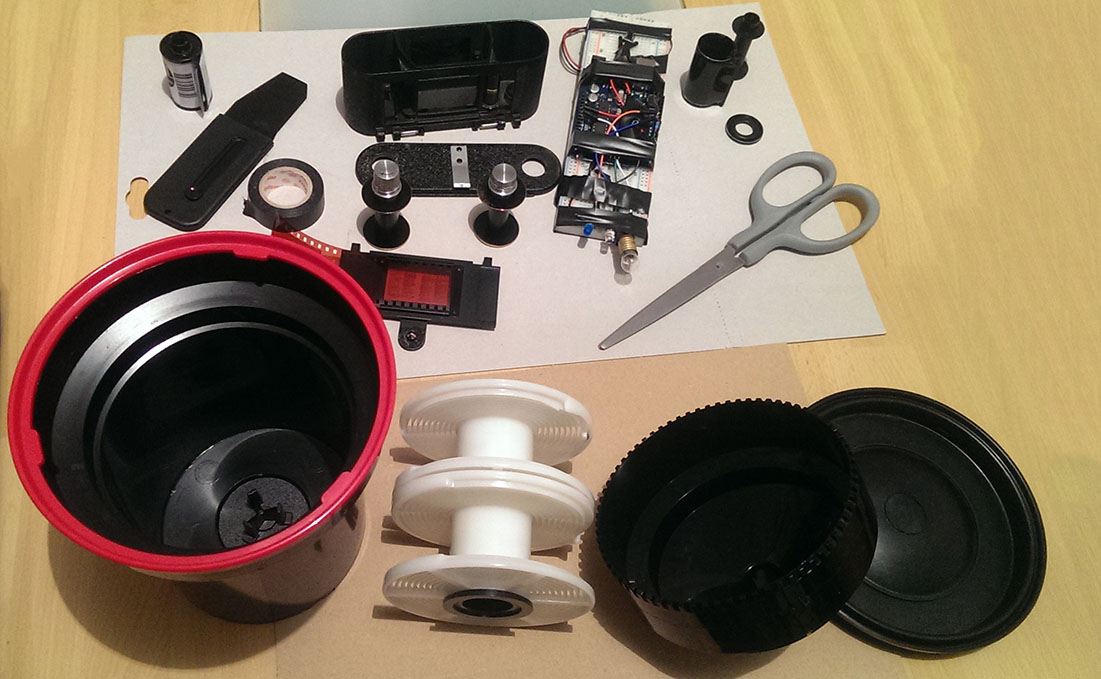
Next we bring almost all the bits and pieces shown at the beginning of this post into the darkroom: The Eldia body and its spools and top cover, scissors and tape, the complete development tank setup and of course the target film, still in its original black plastic can. We do not even want to open the can in the shade, as the CN200 is made on polyester base which is affected by severe light-piping. This means that just by taking the film out of its black plastic can, light that shines on small piece of the film’s leader could possibly pipe into the otherwise light-tight canister (like fibre optics). This can fog the first four frames and ruin them for us. So all bits and pieces are now in the darkroom, we only leave the glass window piece in the light for now.
In complete darkness:
We tape the leader of the target film onto the feed spool of the Eldia.
Next we load the film onto the feed spool. I found that this can be done very fast by holding the feed spool with one hand and moving the film canister like a crank around it. We cut the film from the canister at the end with our scissors and always keep a finger on the spool as shown below, as it otherwise would spring open and fly around the darkroom.
Now we benefit from having attached tape to the take-up spool already, we connect the film to it, however will need to keep the emulsion facing outside. So whilst on the feed spool the emulsion faces inside (which protects it), the take-up spool will have it facing out (so we have to be extra careful not to scratch it). Then comes the funny part, pushing both spools into the Eldia body and having the film slide in between the very tight pieces of the gate and at the same time always keeping some pressure on the feed spool so that no film will violently spring open and unwind.

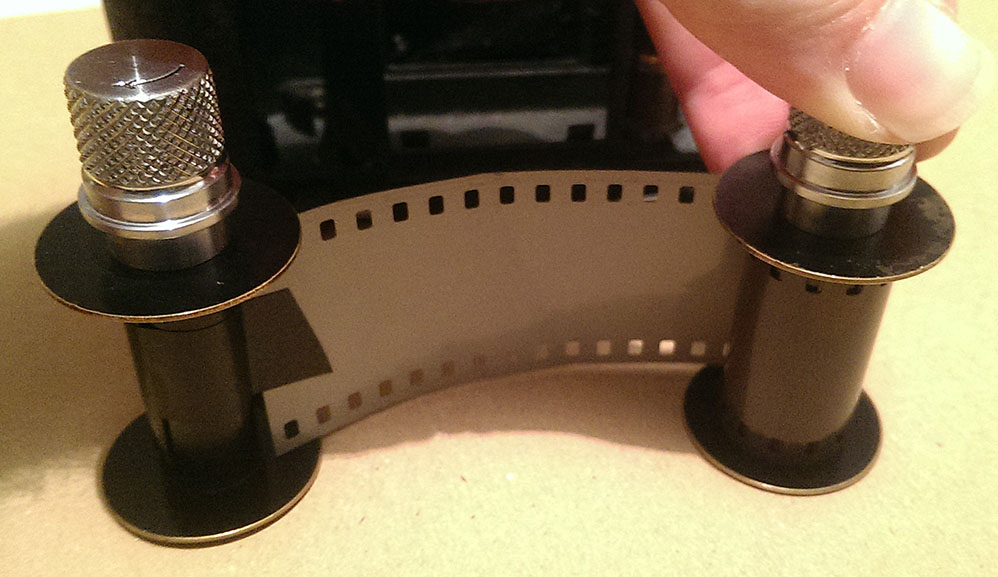
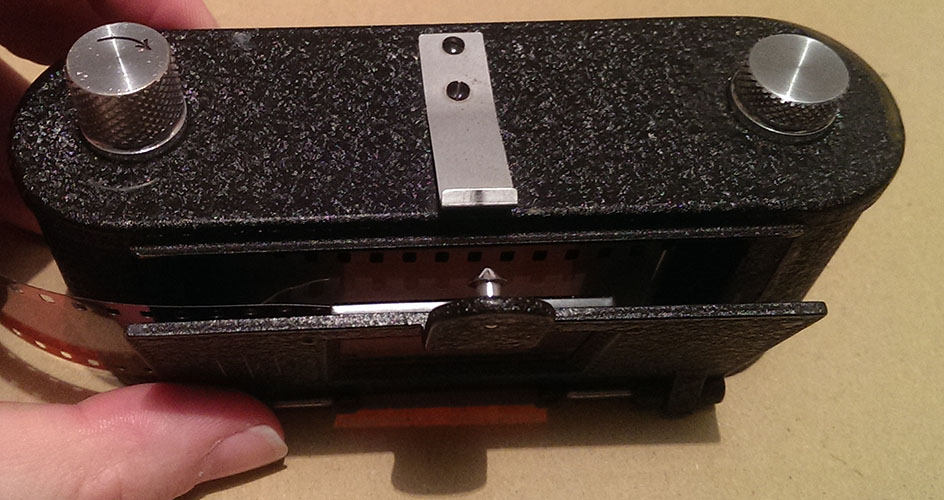
Finally, the film needs to catch the sprockets (see marked in red below) next to the feed-spool and we attach the top cover to keep everything in place – try doing all of this in complete darkness!

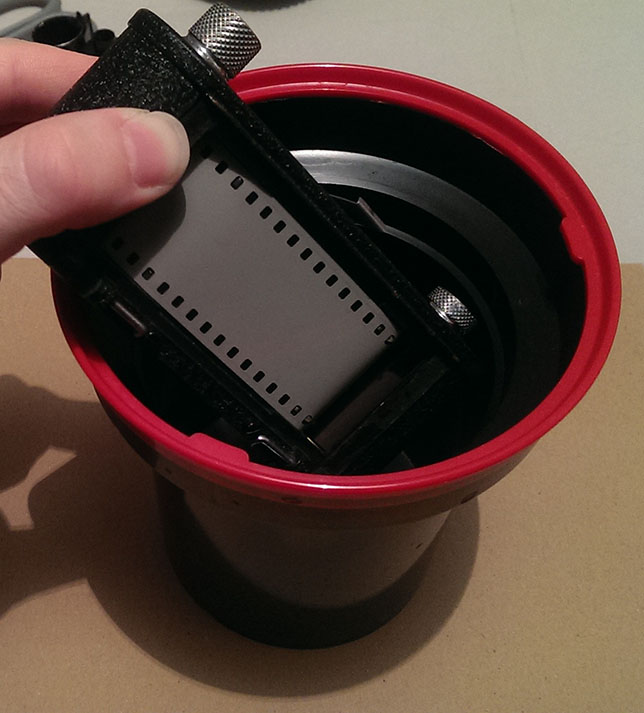
We are now ready to start printing, but of course need to pick up the source negatives and the glass window piece for this. As we need to leave the darkroom, the unprotected film in the Eldia needs to be put in a light-tight environment, I simply chose the developing tank.
In light:
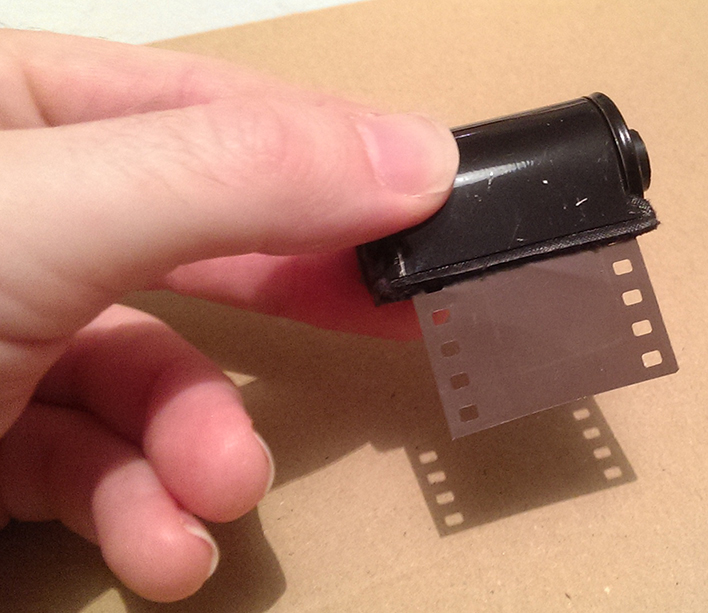
We correctly frame the source negative in the glass window piece. The emulsion is facing us in this picture below as this side will be pressed onto the Eldia, which, as said before, has our target film loaded with its emulsion out. In the end both films will touch through their emulsions.
In complete darkness:
Back in the darkroom we take the Eldia with the target film out of the developing tank with one hand, holding the source negative in the glass window piece in the other hand. Now we need to find out by touching the Eldia where the spaces for the glass window teeth are and correctly insert them.

Next we have to keep both pieces pressed against each other. Below you can see the windows’ teeth inserted and you can notice the negative’s frame through the glass window.
Now we place the light source in the correct distance (based on earlier experimentation, but in a reproducible way) and hit the switch once, exposing the first frame. One hand keeps the negatives pressed against each other, the other hand works the light source.
After the exposure we need to advance the target film to the next frame (or else would double expose it). We need to carefully tilt away the source negative in the glass window piece in order not to scratch it when advancing the target film. The Eldia uses the left knob to turn the take-up spool, one can feel a resistance twice when turning it, once after each half-frame, therefore after hearing two soft clicks or rather feeling them, the next frame is reached and the next exposure can start.
I re-use the same source frame as I want to expose it 18 times with 6 different durations of 3 different light sources. If you wanted to print a different frame each time, you would have to put the Eldia in the tank again, load the next frame in light, come back into the darkroom, unload the Eldia, attach the glass window piece and expose the next shot – this as you can see is a lot of manual effort!
Finally, when all frames are exposed, we have to unload the full take-up spool, again holding the film down so that it won’t unwind, now it’s even more important as it is wound the other way round (emulsion side out) and has a lot of – like this website’s name – film curl!! One would like to simply load this onto the developing tank’s spool, but unfortunately there are two big problems: Usually you need two hands to work the developing spool, to load film onto it. But with two hands there, no-one will stop the film from unwinding violently. And secondly, the film is wound the other way round now and loading it that way will prove to be major pain and also increases the chances of scratching the emulsion!

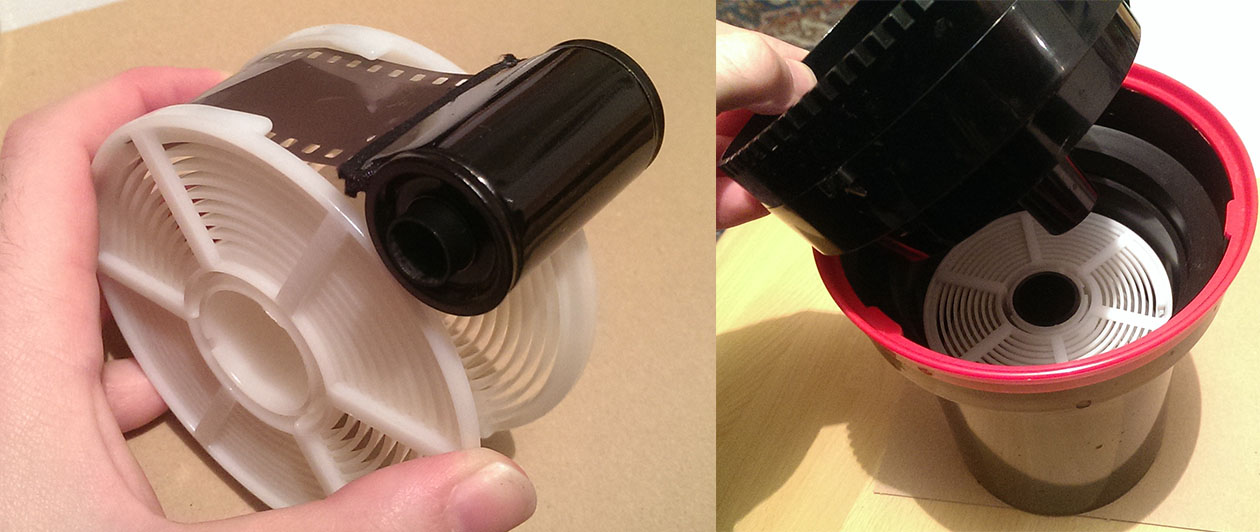
I came up with the idea to spool the film into a reloadable cartridge and then load that cartridge step by step onto the developing tank’s spool. The great advantage of this is that, like when you develop any normal film in a cartridge, only a small piece of film is ever taken out, the rest of the film is either already on the developing spool or still safely inside the cartridge that keeps it from unwinding. You can let go of the cartridge and use both hands on your developing spool. Below you see the pieces of the cartridge, how I tape the film to its spool and then close it. Notice who on the cartridge’s spool the emulsion will be back inside, just how we want it to be, so this step will also solve that problem.
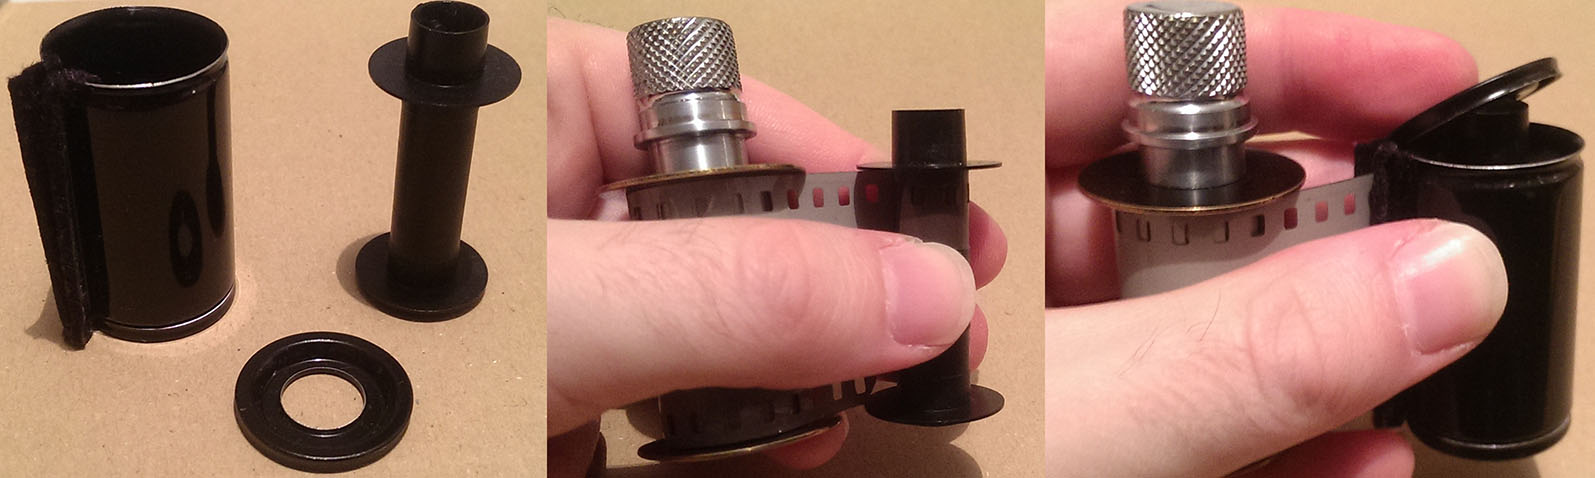
The only issue now of course is how to easily spool the film from the open Eldia spool (with its emulsion facing outside) onto the cartridge without scratching or even touching the emulsion at all but also whilst still keeping the film from unwinding during that action. As shown below, I hold the cartridge between thumb and ring finger, the Eldia spool can freely turn between my palm and my pinky, the flanges of the Eldia spool are big enough to keep the emulsion away from touching my palm and I can safely hold all pieces with just a single hand. I use my other free hand to turn the scissors and quickly spool the film. This is one of many small tricks I found whilst practicing and trying different things for days before I used these experiences on the target film.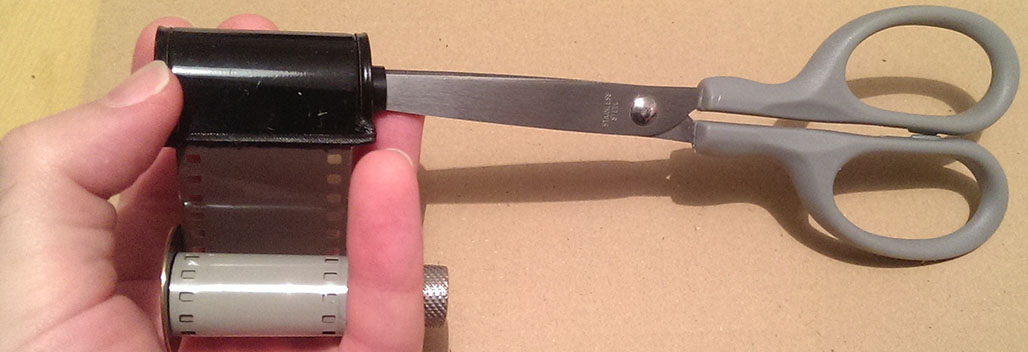
Using scissors and holding the Eldia spool that way proved to work really well.
Finally, the cartridge can be loaded onto the developing spool as commonly done before processing negatives. The tank is closed and ready for C-41 color chemistry. We can now leave the darkroom and develop our contact-printed negatives in light.
The results
I had to work 45 minutes in complete darkness in my darkroom (minus a few minutes in light to change to the second source frame to print) to have the 36 frames of the target film exposed and loaded in my tank ready for the usual C-41 home development. Quite a lot of effort, but everything worked out fine on this very first try, which in itself is already a great achievement.
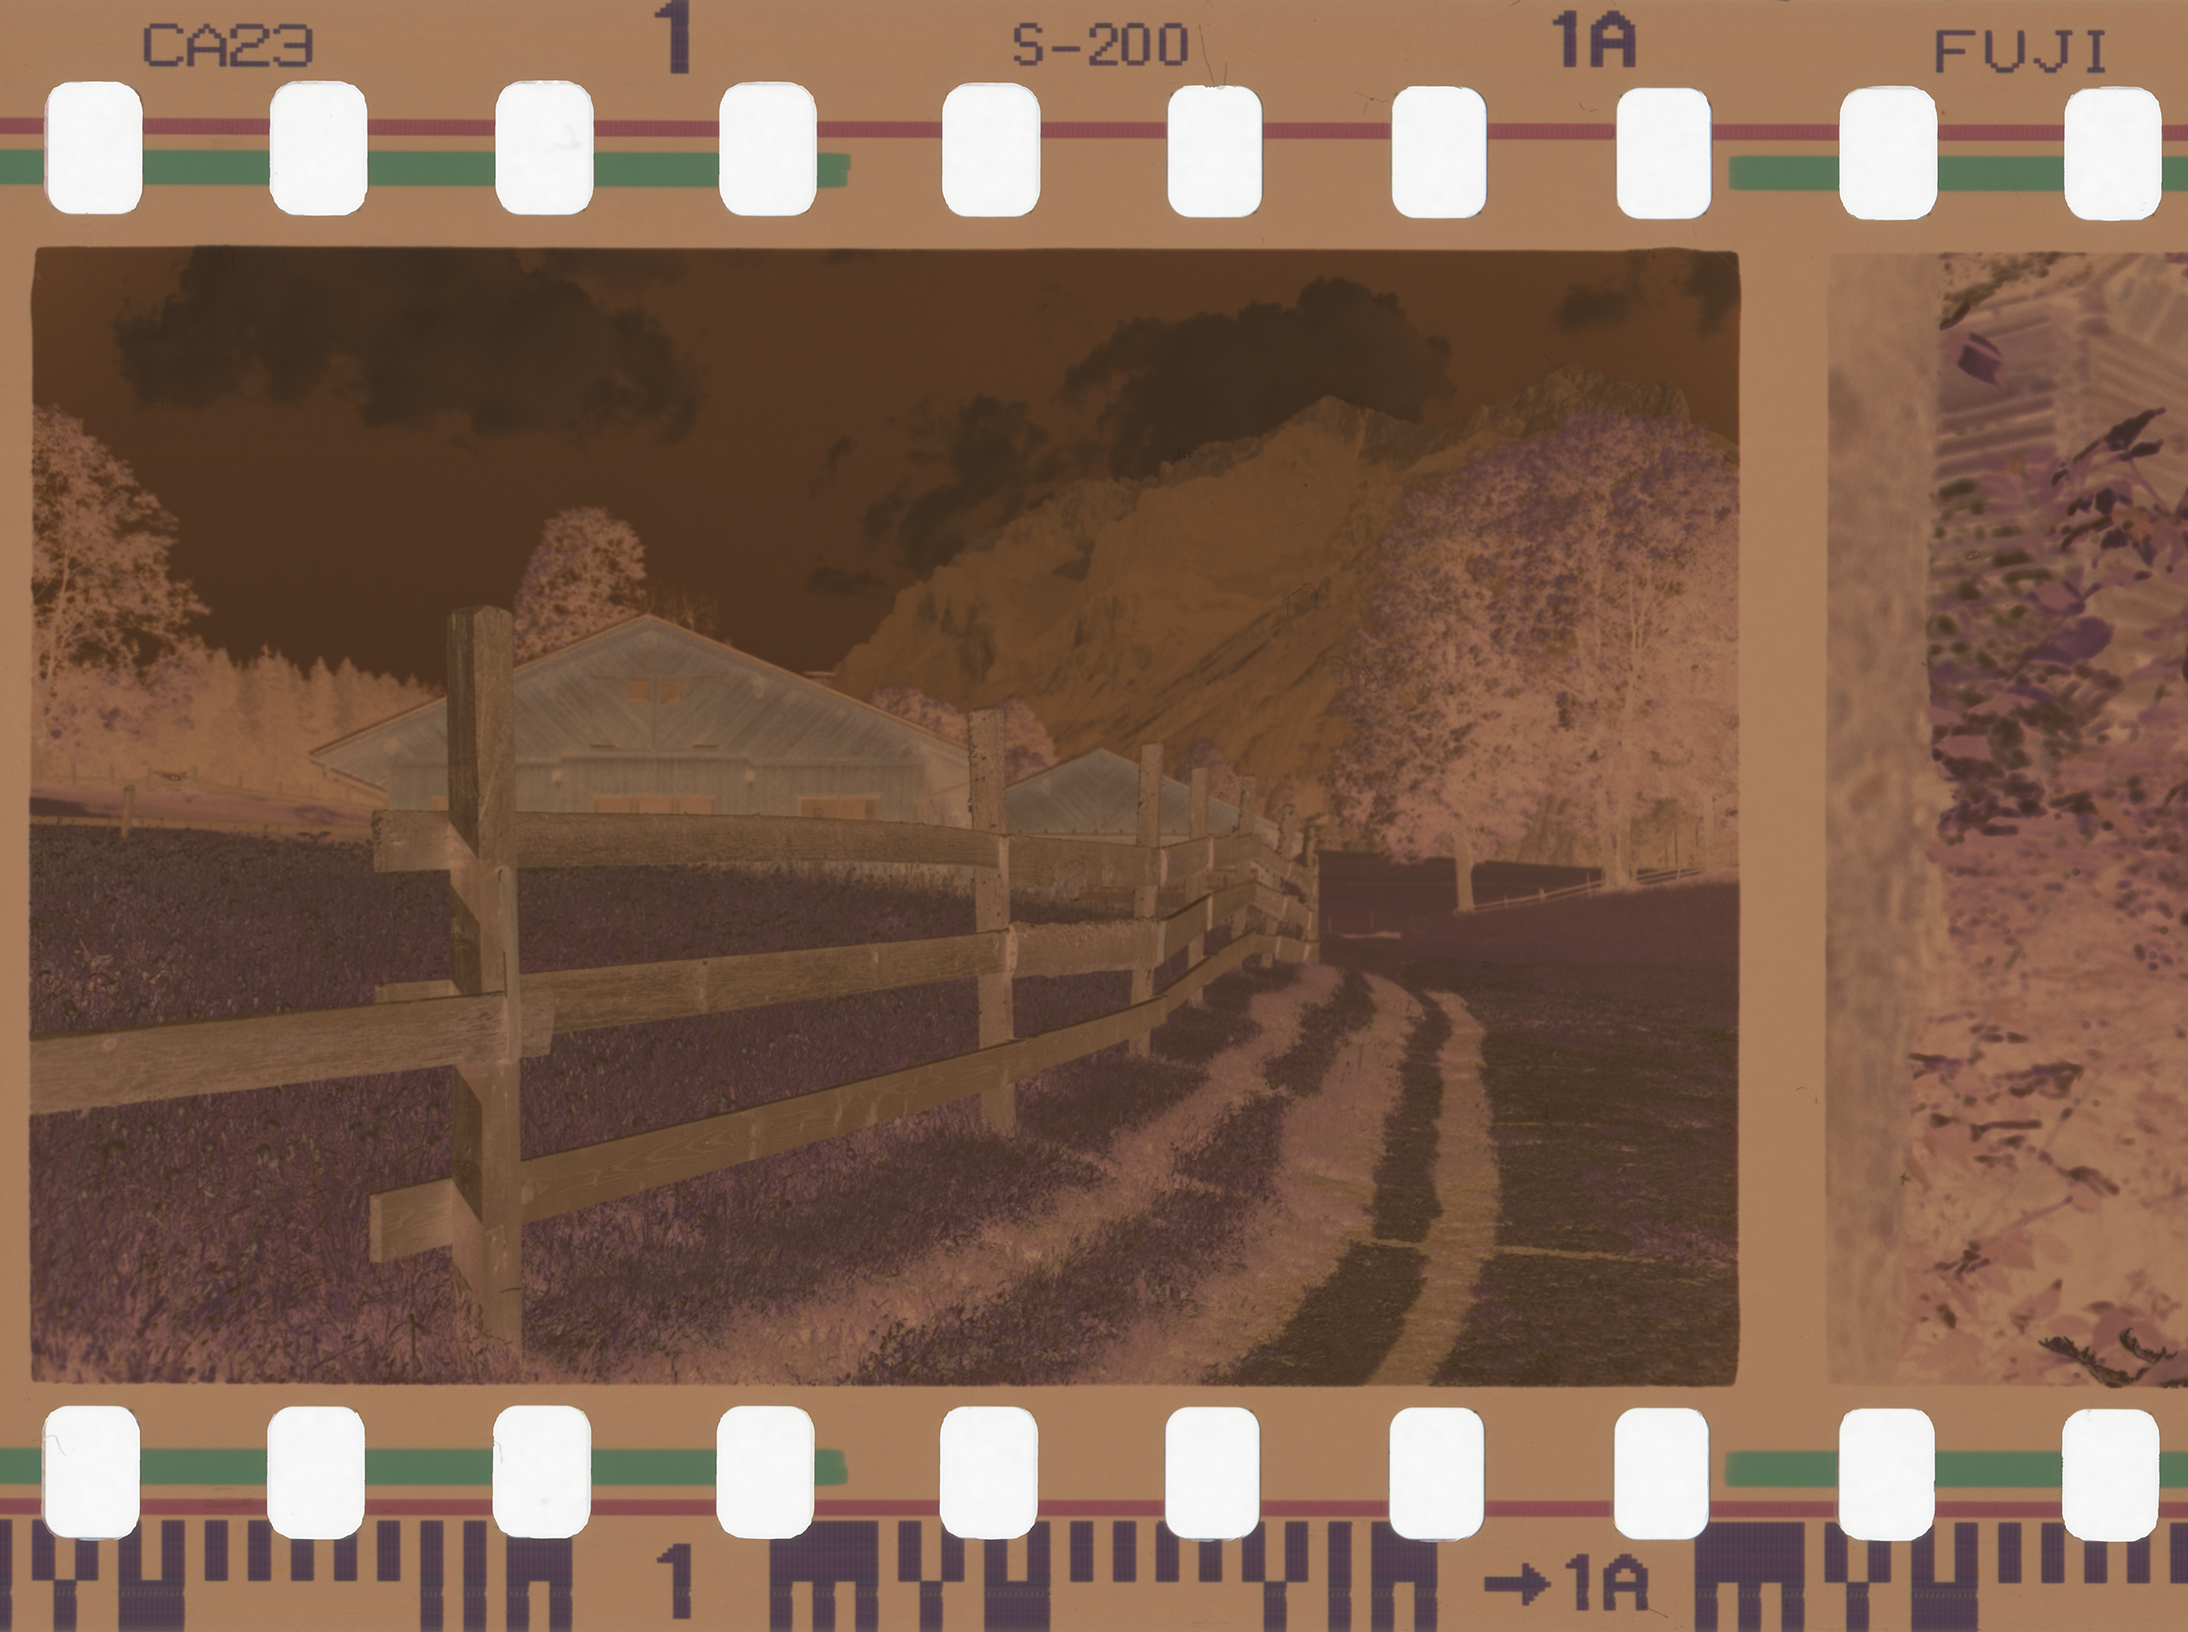
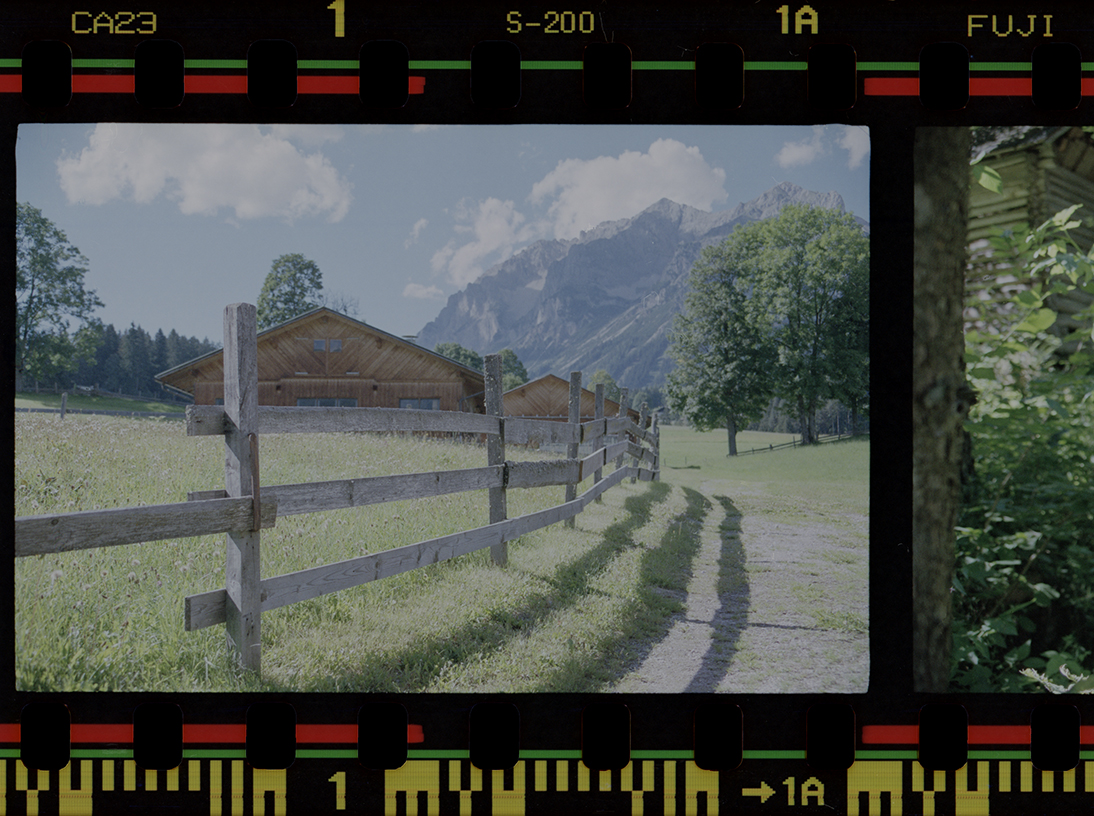
Below you can see one of the two source frames I used, it is an original camera negative I shot some months ago, the normal kind that after scanning and inverting into a positive would show up in my gallery (don’t forget to check it at http://gallery.filmcurl.com). I chose this one as it is one of only a few photos I shot with deep focus, where everything is in focus. It is a good choice to help to judge the sharpness of the resulting positive.
Simply color inverting the above source negative and setting the black point to the frame lines (area in between frames) gives the result below. We could basically say that this image is the unprocessed version of what we photographed, it is too bright and the colors are not great yet, but this is before any color correction was done (which is always required as scanning never yields great results right away).
Bellow you can see the resulting target film strip we exposed by printing onto it. While this is of course a scan, it is quite close to how the real film strip looks like. Notice how, unfortunately, CN200 is not really maskless as slide film would be. See the awful grayish base color! Because of this, directly projecting the film strip will not look great.

When selecting the frame lines as the white-point (similar to what we did above with black-point), we get a much more pleasing result shown below. Notice how the frames get darker from left to right, as this is negative (which gets darker the more it is exposed) we actually see the exposure times grow from left to right. The frames were exposed with the white LED.

And finally, we are focusing on the second frame from the left and comparing it to the inverted source negative. Keep in mind that in both cases there is no color correction and in both cases only the black or white-point was set to the frame lines, which gets rid of the gray base color cast of the CN200. The images look quite similar indeed! So bottom line, this whole process does not immediately lead to slides that look great in projection (caused by CN200’s annoying gray base), but the prints are sharp and show none of the usual lens distortions or other quality defects one would get from simply photographing them off a screen or through close-up lenses.

I was very pleased with the outcome, considering how complex the process is and the fact that I never did this contact-printing ever before and even created the process steps on the fly and developed my own smart light source specifically just for this. Overall it was a very nice experiment!